The documentation matches version 1.5.0 of our software. Download the latest release here.
- Intended use
- Supported connections and protocols
- Configuring Simple Data Logger
- Logging data
- Further processing
*SDL Plus feature
Intended use
Simple Data Logger (SDL) writes data received from a connected device to a file (CSV format). SDL can either log all printable characters or extract a number (typically a measurement value) from the received data. The date and time can be added to each line.
The Plus version also supports polling: A command is sent to the device to prompt it to send data. Further processing functions are also available.
SDL was originally developed for use with scales and balances. It also works with other measuring instruments and more (almost) all devices sending data in ASCII format.
Supported connections and protocols
SDL supports connections made through a COM port (RS232, USB virtual COM port, Bluetooth Serial Port Profile, etc.) or over TCP/IP (Ethernet, WLAN; SDL acts as a TCP client on a persistent connection). Data sent by your device must be in ASCII format.
Configuring Simple Data Logger
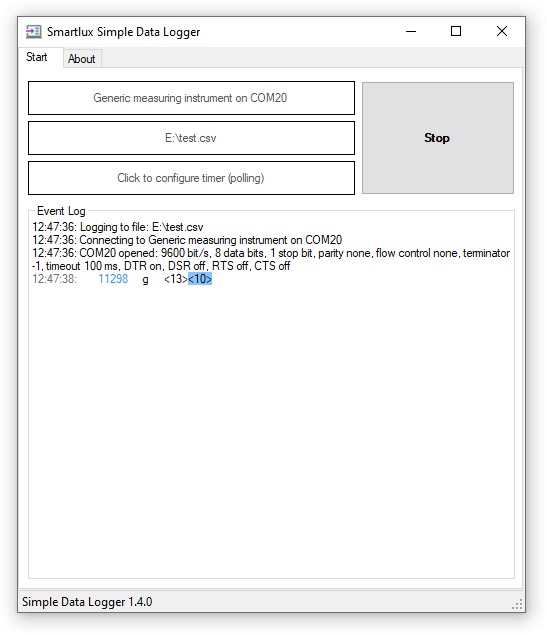
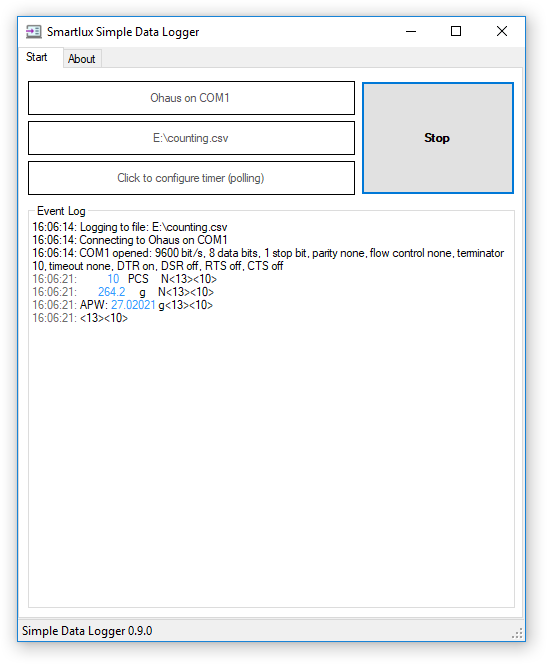
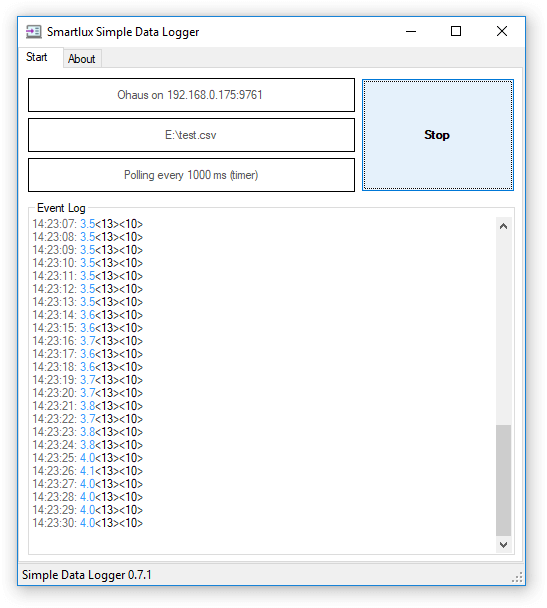
SDL is organized in tabs. The Start tab is shown when SDL is launched:
![]()
![]()
To configure SDL, please go to the Input and Output tabs. Advanced features and settings can be found in the Control and Process tabs. License keys can be entered and managed in the License tab.
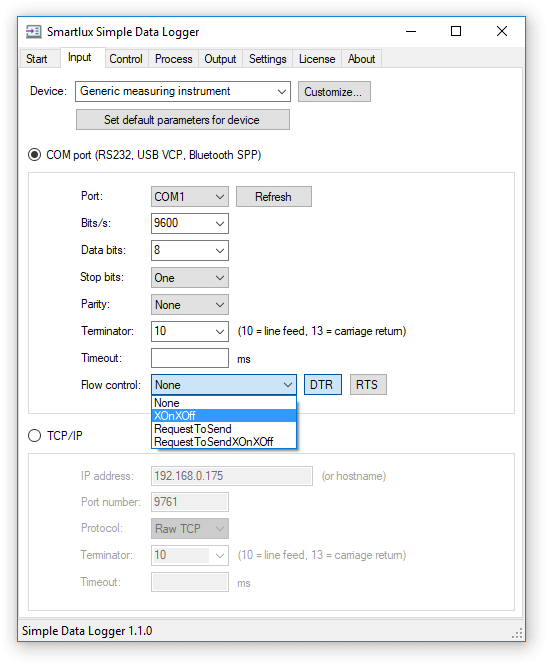
Input tab
Here you’ll make settings for the connected device (from which you want to receive data).
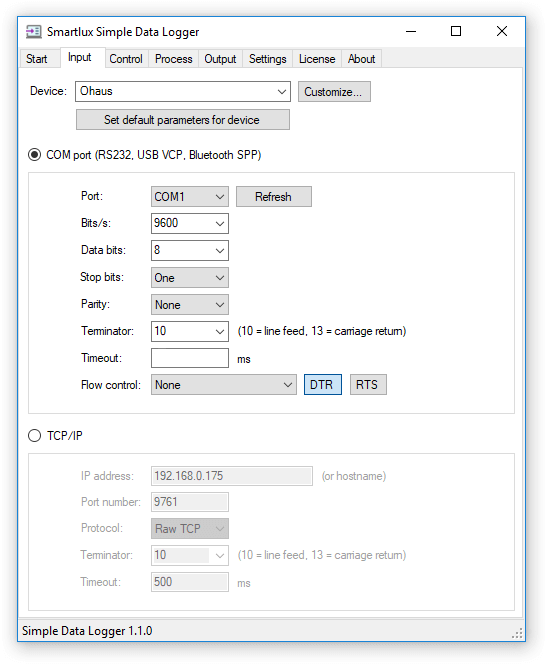
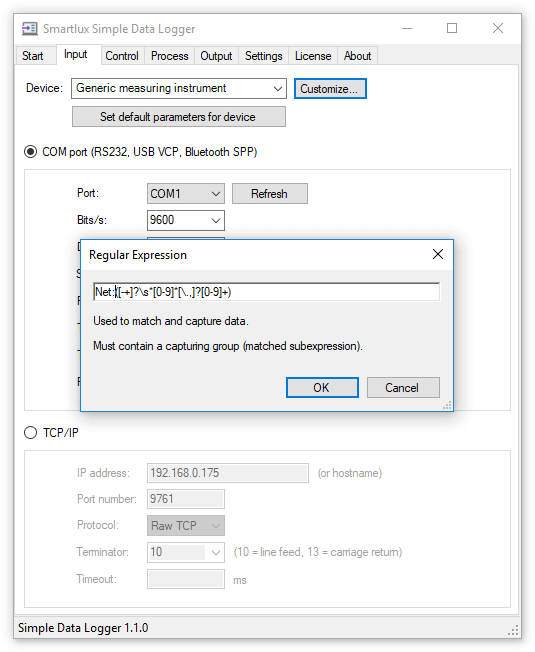
If your Device is included in the list, select it and press Set default parameters for device. This will automatically set the interface parameters (bits/s, etc.) and the Terminator. If your device is not included, select either “Generic measuring instrument” or “Generic text device” (e.g. for bar code readers) and set the interface parameters and Terminator manually. Please ensure that all settings match those of your device or communication will fail.
The following device profiles are currently available in SDL:
- Generic measuring instrument: SDL will capture the first number unless you modify the regular expression.
- Generic text device: SDL will capture all alphanumeric characters.
- A&D scales and balances: all of them use the same data format, you might have to change the data transmission mode to suit your application.
- A&D LCCU21 USB button load cell (only for use with polling).
- Acculab AL balances.
- Adam Equipment CBK, *GBK, GFK (GK indicator): set “C8 LAb” to “off” in the menu of your scale, particularly if you’re using continuous transmission mode “Ct StA” oder “Ct AnY”).
- Adam Equipment CPWplus: set the scale to “trn 2” for continuous transmission or to “trn 3” to use polling or the print button on the scale (port is set to “trn 1” and therefore disabled by default).
- Adam Equipment GBC, GFC (GC counting indicator): you can choose to capture the weight or the number of pieces.
- Adam Equipment HCB (“Highland”) via RS-232 or USB virtual COM port.
- Denver Instrument balances (same as Sartorius legacy).
- Kern DE series scales: default settings of the scale work with polling (or by pressing the print button), but you can also set it to transmit automatically or continuously.
- Kern 572, 573, KB, DS and FKB scales (all made in Germany).
- Kern KFB indicator (used by IFB platform scales).
- Mettler-Toledo MT-SICS protocol.
- Ohaus scales and balances.
- Ohaus Scout Pro (SPU), Traveler (TA), Navigator (NV, NVT) scales: default settings of these scales work with polling (or by pressing the print button), but you can also set it to transmit automatically or continuously.
- Sartorius balances:
- Legacy devices,
- Sartorius Entris, EK, GK and GW,
- Sartorius SBI protocol,
- Sartorius SICS protocol.
- Scale Manufacturers Association Standard Scale Serial Communication Protocol (supported by several manufacturers).
If you’re a manufacturer and would like us to include your instruments, please contact us.
Optional: Customize the regular expression used to match and capture data
SDL uses a regular expression to match and capture the data you want to record. You can edit it by clicking on the Customize button:
Notes:
- Regular expressions use the C# .NET syntax.
- Customized regular expressions will not be overwritten unless you change the Device, press Set default parameters and confirm overwriting in the dialog that appears.
COM port or TCP/IP
Choose between a COM port (RS232, USB VCP, Bluetooth SPP) or a TCP/IP connection by selecting the appropriate radio button.
Note: For TCP/IP connections, we currently only support persistent connections where SDL acts as the TCP client and connects to a device acting as the TCP server. Data has to be sent as “raw TCP” (used by Ohaus scales and balances as well as many RS-232-to-Ethernet converters like the Moxa NPort series) with no higher-level application protocol.
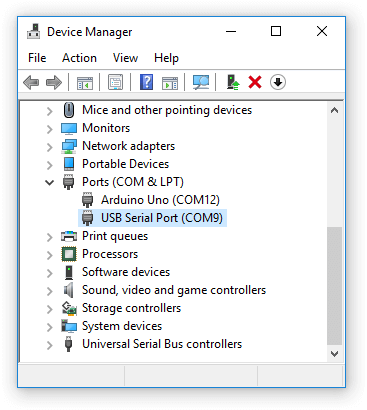
Make sure that all settings match those of your device. If you’re not sure which COM port your device is connected to, open the device manager in Windows and consult the “Ports (COM & LPT)” section. When you plug in and unplug a USB VCP device, you should see a COM port appear or disappear:
Terminator or Timeout
The terminator (a.k.a delimiter) is the very last character in each line of data sent by your device. If your device is included in the device list and you’ve pressed the Set default parameters button, the terminator will be set automatically. You can also select one of the values from the combo box or enter any ASCII code as a decimal value.
![]()
![]()
In the example above, the very last character is “line feed” (ASCII code 10).
As an alternative to using a terminator, SDL also supports a Timeout: If no additional data has been received in the specified time, SDL assumes that the line of data is complete. Enter the timeout in milliseconds (100 ms is usually a good starting point) and leave the terminator field empty (you can also use both at the same time, but this is usually not what you want).
Tip: If you don’t know which terminator your device uses, leave the Terminator field empty and try entering a Timeout of 100 ms. Then, transfer some data from your device and have a look at the Event Log in the Start tab. You’ll usually be able to identify the terminator (10 in the example below). Don’t forget to delete the timeout as it is no longer needed.
Flow control (handshaking)
Simple Data Logger supports XON/XOFF software flow control and RTS/CTS hardware flow control for COM ports (and a rarely used mode that uses both). In addition to these methods, you can also enable the “data terminal ready” (DTR) and “request to send” (RTS) control signals for the duration of the connection by clicking on the corresponding button:
 Please note that you cannot manually set the RTS signal when using RTS flow control.
We recommend settings flow control to “None” and only enabling it if required by your serial device. Please consult the manual of your device for further information.
Control tab
This tab contains all settings for sending commands to the device.
Polling (SDL Plus feature)
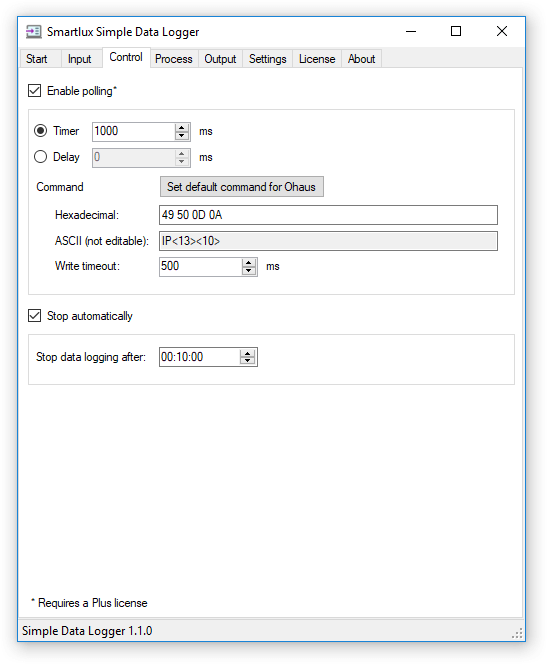 Enable polling if you want to send a Command to your device that triggers a response. Example: Many scales and balances will send the current weight after receiving a corresponding command.
Note: Please consult the manual of your device or contact the manufacturer to find out if your device offers a command mode and which command has to be sent. If your device does not support this functionality, there’s nothing that SDL can do about it.
The Command has to be entered as a 2 Hexadecimal characters per byte, separated by a blank space. This allows you to send non-printable characters. The ASCII text is shown for reference purposes. In the screenshot above, “49 50 0D 0A” results in “IP” followed by carriage control and line feed.
If the Set default command button is active, you can press it to set the default polling command for the selected device. Otherwise, please consult the manual of your device to and use tools like asciitohex.com for the conversion.
Note: For balances, there are often two different commands to request the weight:
- Send the weight immediately (e.g. MT-SICS “SI” command or Ohaus “IP” command).
- Send the weight only if it is stable (e.g. MT-SICS “S” command or Ohaus “P” command).
Only the first command can currently be set automatically when pressing Set default command. If you’re using a verified scale (legal-for-trade scale), this command may be disabled. Please consult the manual of your device for a complete description of all available commands.
When you select Timer, SDL will repeat the command at the entered interval (in milliseconds, ms). The command will be repeated whether or not an answer form your device has been received. This is usually the setting you want to use.
Alternatively, you can use a synchronized polling mode by selecting Delay. The delay you enter is the time that SDL waits after receiving a reply and before repeating the command. If you want to poll your device as fast as possible, set the Delay to zero.
Important: When using this “as fast as possible” mode, it is important to know how many lines (defined by the terminator) are sent as a response. If your device receives one command and sends multiple lines as a response, use the Ignore and Combine settings in the Process tab to prevent SDL from replying to each line with a new command.
You should set a Write timeout if you’ve chosen a flow control mode (handshaking) in the Input tab. To set the write timeout to indefinite, enter “-1” (not recommended as the port could be blocked indefinitely).
Start data logging with program start (SDL Plus feature)
Eliminates the need to press the Start button. The program will start data logging automatically with the last used settings:
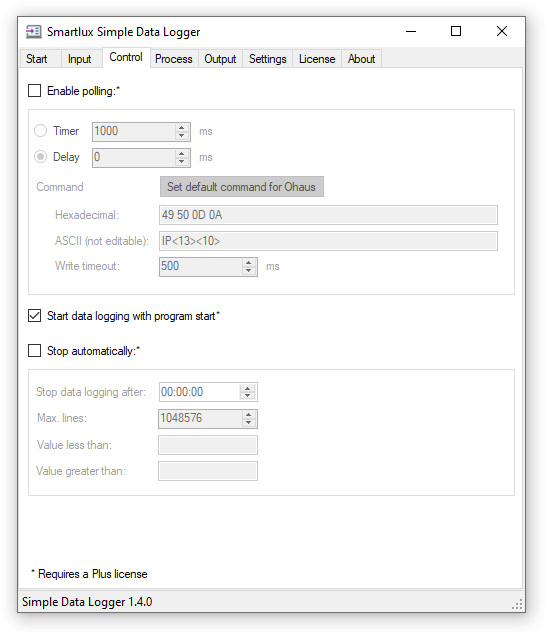
Stop automatically (SDL Plus feature)
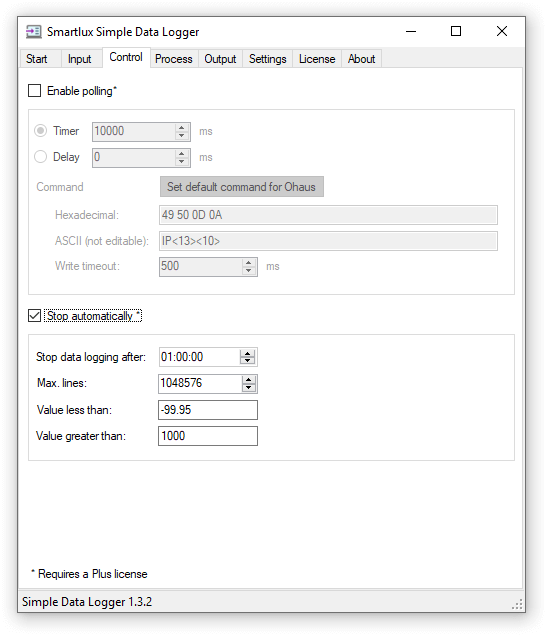
If you want SDL to Stop automatically, you can set the following conditions:
- Time (as HH:MM:SS), leave at 00:00:00 to disable.
- Maximum number of lines (Excel can open files with up to 1048576 lines), set to 0 to disable.
- Value less than: enter a decimal number (with a dot as the decimal separator). SDL will stop when the numeric value captured from the connected device is lower than the entered value.
- Value greater than: as above, but SDL will stop when the captured value exceeds the entered value.
The effect when one of the auto-stop conditions is fulfilled is the same as pressing the Stop button in the Start tab. The message “Stopped by user or auto-stopped” will appear in the Event log.
Process tab
This tab contains settings which relate to how the data received from your device is processed.
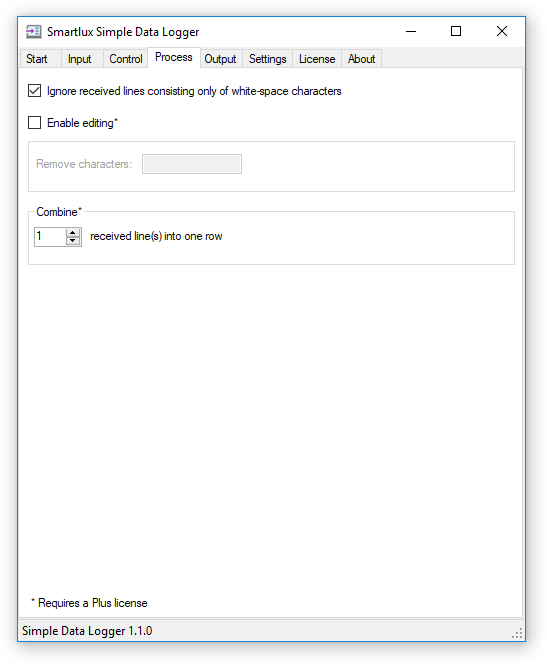
Ignore received lines consisting only of white-space characters
If your device sends “empty” lines which only contain white-space characters like carriage return and line feed, SDL will ignore these lines if you leave the first checkbox enabled (default setting). This means that further processing will be skipped and these lines will not be written to the file. This can be useful when dealing with output formats originally meant for printers which contain many line feeds.
Note: This setting only ignores lines which were received empty. If nothing has been captured from the data sent by your device, this setting has no effect.
Note: If you’re using synchronized polling with a delay, ignored lines will not be considered to be a reply from the device and will not trigger SDL to repeat the polling command.
Enable editing (SDL Plus feature)
Enable editing if you want to remove characters from the data received from your device.
This is usually only necessary under special circumstances. Most devices available in SDL are numeric devices and will only capture (decimal) numbers (the only exception is the generic text device).
However, as shown above, you can modify the regular expression used to capture data. If you do this and include characters which are not numbers, use the Remove characters function to remove them so that SDL can correctly process the number.
Real-world example:
The screenshot below shows the weight received from an legal for trade (verified) A&D EK-6100i-EC precision scale. The last digit of the weight is enclosed in parentheses. By default, SDL ignores this digit (it’s not shown in blue):
To capture it, replace the default regular expression with:
([-+]+[0-9]*[\.,]?[0-9]*\[[0-9]*\]+)
Then, enter the square brackets “[” and “]” under Remove characters in the process tab to ensure that SDL removes them before writing the weight to a file.
Enable filtering (SDL Plus feature)
If your device sends more data than you want to record, you can use this function to instruct SDL to record one line for every x received lines (and ignore the rest):
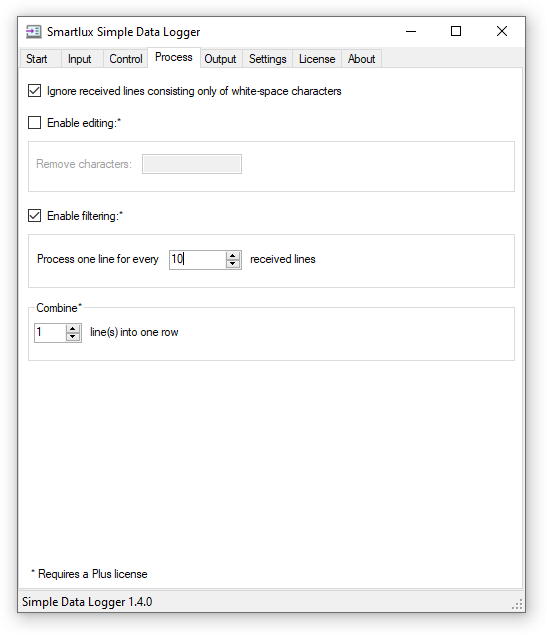
In the screenshot above, processing one line for every 10 received lines means that the SDL will only record the following lines:
No. 10, 20, 30, 40, etc.
Combine received lines into one row (SDL Plus feature)
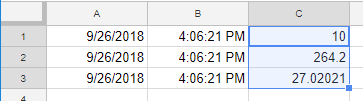
This setting allows you to perform an especially useful conversion if the data sent by your device consists of multiple, distinct values like in the example below:
The values were sent by a counting scale: The first line contains the number of pieces (count), the second one the net weight and the third one the average piece weight (APW). The last empty line is ignored.
Normally, they would also be written in separate lines by SDL. The CSV would look as follows when opened in a spreadsheet application:
This format is not ideal for further processing. By combining 3 received lines into one row, the data will appear in separate columns:

Note: When using synchronized polling with a delay, the combined lines will count as one reply from the device.
Output tab
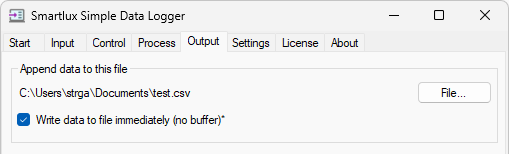
Choose a file
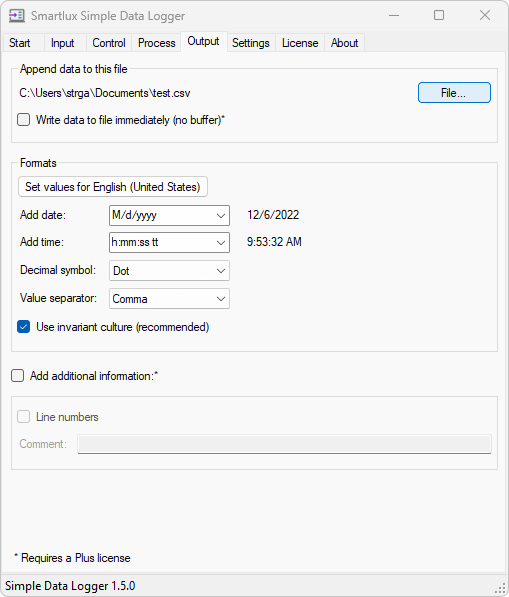
Write data to file immediately (SDL Plus feature)
By default, SDL uses a buffer and writes data to the file when the buffer is full (or data collection is stopped). If you want SDL to write each line of data to the file immediately, select this check box:
This functionality was introduced in SDL 1.5.0.
Formats
You can manually select or enter a Date and Time format or choose “None” from the list if you do not want to record the date or time. The Decimal symbol (for numeric values) and Value separator (character used to separate values from each other) will also be set automatically if you use the Set values button. However, if you want to later open the CSV file on a system with different language or region settings, you might have to change these settings manually.
If you want your numbers to have a dot as decimal symbol, you should use “Comma” as the value separator (e.g. in the US). If you use a comma as the decimal separator, select “Semicolon” as the value separator (e.g. in Germany). Never set the same character as the decimal symbol and value separator!
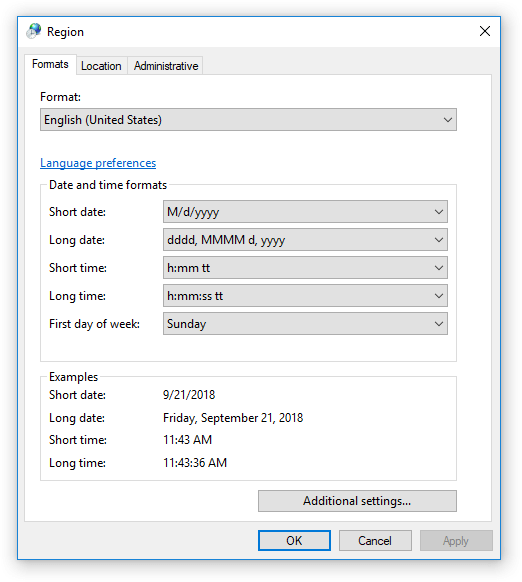
Leave Use invariant culture checked unless you want to use localized long day and month names (e.g. “Freitag, 21. September 2018“).
Add additional information (SDL Plus feature)
Enable the check boxes to add automatically generated line numbers and a comment (e.g. the project or sample name) to each line:
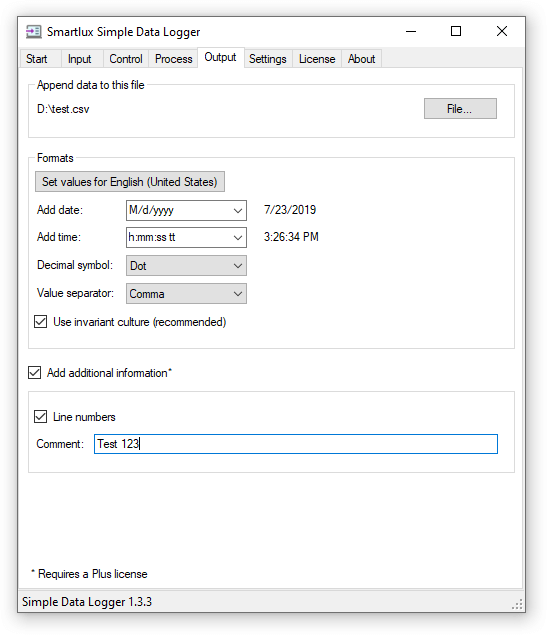
Line numbers start from 1 each time the Start button is pressed. Together with the comment, this can help identify captured values in a large file and improve traceability:
Settings tab
The Settings tab currently allows you to configure the behavior of the Event Log and to Reload or Restore user settings:
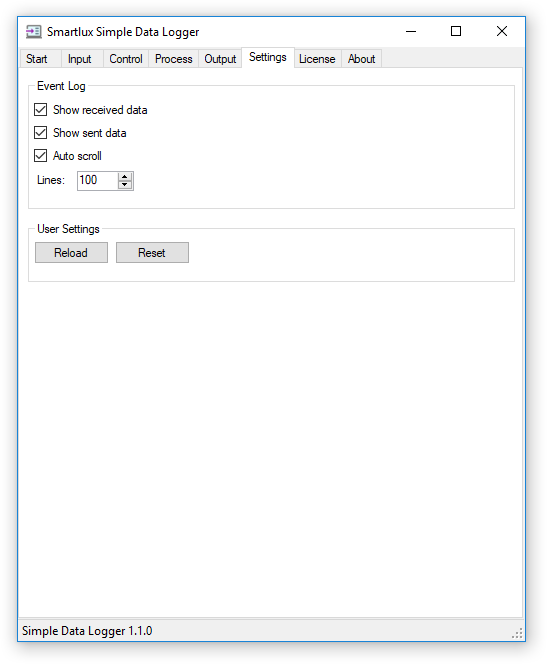
Un-check Show received data and Show sent data if you only want status and error messages to appear (but no data received from or sent to the connected device). This can be useful if data is sent at an extremely high rate.
The screenshot below shows received (captured) and sent data (both checkboxes enabled):

Disable Auto scroll if you want to prevent SDL from automatically scrolling to the latest entry in the event log.
The number of Lines before the event log is restarted (overwritten) can be set from 10 to 1000. This only affects the event log displayed in SDL and not the data logged to a file.
Press the Reload button to restore the last saved user settings (settings are saved automatically when the application is closed). This is useful if you want to undo changes that you’ve made in the current session. The Reset button will reset all user settings to their default values (as if you’d just installed SDL).
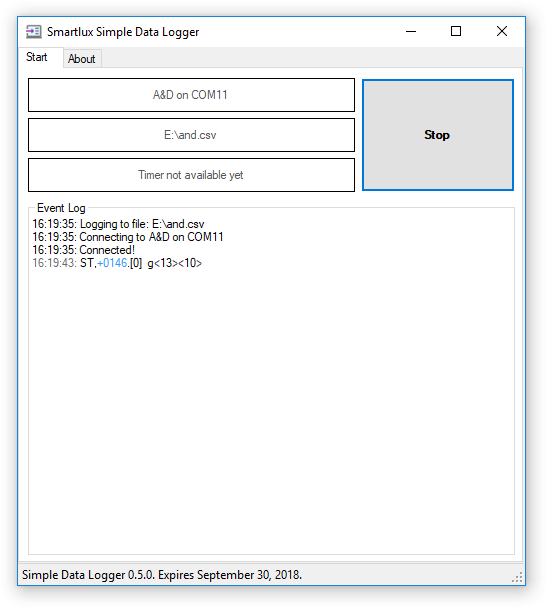
Logging data
Error and status messages will also appear in the event log.
To stop data logging and close the file, press the Stop button:
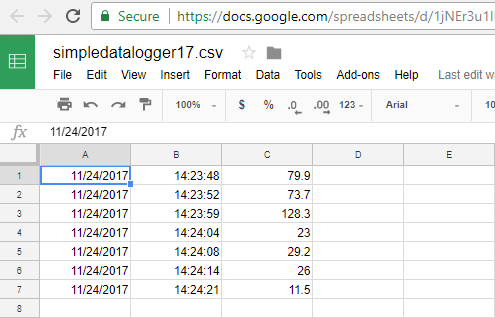
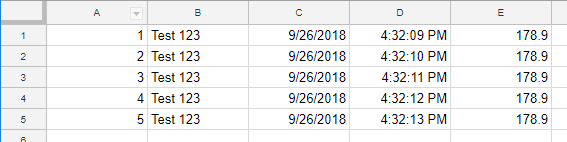
Further processing
Open the file in the application of your choice, e.g. spreadsheet software like Microsoft Excel, LibreOffice / OpenOffice Calc or Google Sheets (shown below):